|
|
 |
Home > Miata Tech > First and Second Generation (NA/NB) Tech > NA/NB Brake Pad Replacement Brake Pad ReplacementSubmitted by Robert "JTBob" Holland Front Pad ReplacementThe brake pads on the Miata are extremely easy to change, requiring only a few simple tools to do the job right. The front pads will last about 60K miles before needing to be replaced. The rear pads will last around 100K miles. Of course, your mileage may vary. To start, you will need the following items: new brake pads, 4 jack stands, 14mm socket, 12mm socket, 10mm socket, socket wrench, torque wrench, 6mm Allen wrench, flat body screw driver, brake grease, brake cleaner, coat hanger, spoon, and your favorite beverage (I prefer Guinness). 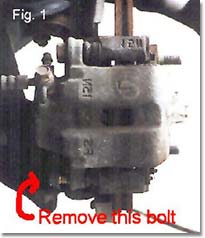
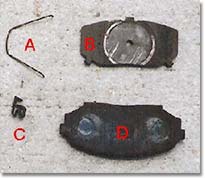
Loosen the lug nuts on the wheels, place the car on the four jack stands (preferably under the jack points), and remove the wheels. We'll start with the front pads. The caliper is held in by two 12 mm bolts, where you'll see a rubber seal on the back side of each caliper bolt. Remove the lower 12 mm bolt (see Figure 1). This will allow the caliper to swing up, exposing the pads. Use the coat hanger to keep the caliper up and out of the way. You'll see two V shaped springs. Notice their orientation and pull them off. You can now wiggle both pads out of the brake assembly. Observe Figure 2: A) Pad spring, B) Backing plate, C) Anti-rattle clip, D) Brake pad.
Feel the brake disc. If there are a considerable amount of ridges in the disc, you may need to have the front discs turned. If you want the discs turned, you need to remove the upper and lower bracket bolts, and let the whole unit hang from the coat hanger, being careful of the brake line (don't let it stretch or bind). With the bracket off, the disc will come right off the hub. If the disc is stuck to the hub, you can use an 8 mm bolt through one of the holes next to the studs. Just wrench the bolt down until the disc rotor pops off the hub. Proceed with the removal of the other side to get that brake disc off. You'll need to find a shop that does brake turning in a fine increment lathe (don't want to remove more disc material than necessary). It shouldn't cost more than $10-$15 per disc. When done, replace the discs and brake brackets, torquing the bracket bolts to 36-51 ft-lb (49-69 Nm). The caliper should still be held up by the coat hanger. Now place the new shims on the bracket (if aftermarket pads, use the old shims). There are four: two top, outside and inside, two bottom, outside and inside. Fit the backing plate on the new pads and place the anti-rattle clips on the bottom edge of the inside and outside pads (look at the old pads for reference). Now use the brake grease on the top and bottom edge of each pad (where it would come in contact with the bracket shims, also on the back side of the backing plate where the caliper piston comes in contact with it. With grease on both pads, wiggle the new pads back into the bracket shims. Do this to both sides of the car. 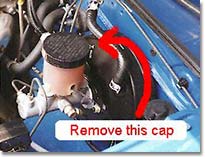
You now have all four front pads back into place. Replace the V shaped springs into the holes of the pads (they should point towards each other, upper and lower). Before you can lower the caliper, you need to push the piston back into the caliper body. As you do so, the fluid level in the master cylinder reservoir (left side of the engine near the fire wall, see Figure 3) will rise. If the fluid level gets too high, you will need to spoon some out, being careful not to get the brake fluid on any painted surface as brake fluid is very corrosive. Now use a flat body screw driver, or if you have enough strength, use your fingers to push the round piston back into the caliper. You can see how much you need to push it in if you lower the caliper down onto the disc pads. You'll see how much interference the piston makes with the pads. Once the piston is retracted, lower the caliper over the pads. Squirt a little grease into the hole where the 12mm bolt came out, and also smear a little grease on the smooth shaft of the bolt, and finger tighten it back into place. Remove the upper caliper 12mm bolt, squirt a little grease into the hole, smear some on the bolt and replace it. Now torque both bolts to 58-65 ft-lb (78-88 Nm). Make sure the brake fluid level is correct and replace the cap. Pump the brake pedal a few times to get the caliper piston to readjust itself. You have successfully changed the front brake pads. Time for a drink. Rear Pad Replacement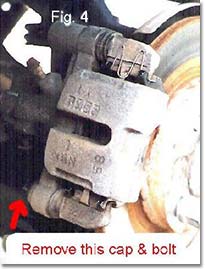
The rear brakes are roughly similar to the front brakes, but there are a couple of key differences. On the back side of the caliper is a 14mm bolt. Remove the bolt and washer. This bolt is a plug to cover the piston adjuster. Put the 6mm Allen wrench in the hole and turn in counterclockwise about 10 turns (you may need to be underneath the car while doing this). I've been told that a small shaving mirror placed on the lower A-arm can be used to view the adjuster from the side of the car without having to crawl underneath to see the opening. The Allen wrench turns a small cam that in turn uses gears to back out the piston, so there won't be any movement in or out of the Allen wrench as you turn it. Remove the lower caliper bolt (10mm and may be covered by a plastic cap) and swing up the caliper (see figure 4). Remove and replace the pads just as you did on the front brakes. Clean the brake assembly, replace the plates and shims, grease the pad edges, replace the pads and this time W springs. The rear pads use a different pad spring. Use the other brake as a reference when replacing these springs and clips. You'll also notice the shims are different from the front. Lower the caliper. If the piston interferes with the pads, use the Allen wrench to retract the piston some more. Remember to check the brake fluid reservoir to make sure it doesn't overflow (keep at the FULL level). Keep turning until the caliper is free of the pads. Squirt some grease in the lower bolt hole, grease the bolt and replace finger tight. Torque the lower caliper bolt to 25-29 ft-lb (34-39 Nm). Upper caliper bolt need not be removed. If you removed the bracket bolts, they need to be torqued to 36-51 ft-lb (49-69 Nm). You now need to position the piston just short of full contact with the disc. Release the parking brake so the rear hub will rotate freely. Using the 6 mm Allen wrench, turn the adjuster screw clockwise until the hub can no longer rotate, then back off the adjuster counterclockwise about 1/3 of a turn. Replace the 14mm bolt and torque hand tight, about 15-20 ft-lb. With all four corners done (or two if only front or rear done), you now need to break the pads in. Go to a flat parking lot (hopefully empty), go about 20 mph and then step hard on the brake pedal, short of locking the brakes up. Do this about 8-10 times. This will heat set the brake pads. Go home and let the car sit on a flat surface with the parking brake OFF, so the pads and discs can cool down evenly. After a couple of hours, everything should be set. Go easy on the pads for about 50 miles to make sure the surface gets worn evenly. Once done, you'll be able to do this whole job again in about 1.5 to 2 hours, depending on how many beverage breaks you take. DisclaimerPlease note that these tips and pointers are not reviewed or approved by Mazda Motor Corporation or any other corporation or entity other than the originator. The San Diego Miata Club does not accept any liability for damage or injury as a result of utilizing these tips and pointers. Please use common sense and always remember safety first. |
|
 With each pad out, note carefully where the metal clips are placed. If you get Mazda brake pads, they will come with new clips, so keep the old clips and backing plates on the old pads for reference. If you get aftermarket pads, you will need to place the old clips on the new pads in the same orientation (keep the clips on the old pads until you are ready for the new pads). Also, there are shims on the caliper bracket (the part that wasn't pulled up) as well. Notice their orientation and pull these out. Now spray the brake cleaner on the brake assembly to remove road grime and brake dust, then dry it off.